TL;DR
A closet can be a perfect spot for voice recording or even housing an AI rig if you focus on placement, sealing gaps, and managing reflections. Proper ventilation and treatment turn tiny spaces into efficient, quiet zones, saving money and space.
Ever tried recording vocals or running a high-power AI rig in a tiny space? It might sound like a nightmare — echo, noise, heat. But with a few clever tricks, your closet can become a surprisingly effective mini-studio or server room. The secret isn’t just about slapping foam on the walls; it’s about placement, sealing gaps, and managing heat.
This guide will show you how to turn that cramped closet into a quiet, efficient work zone, whether for voiceovers, streaming, or AI inference. You’ll learn why placement matters more than foam, how to prevent sound leaks, and how to keep your rig cool without turning it into a noisy furnace.
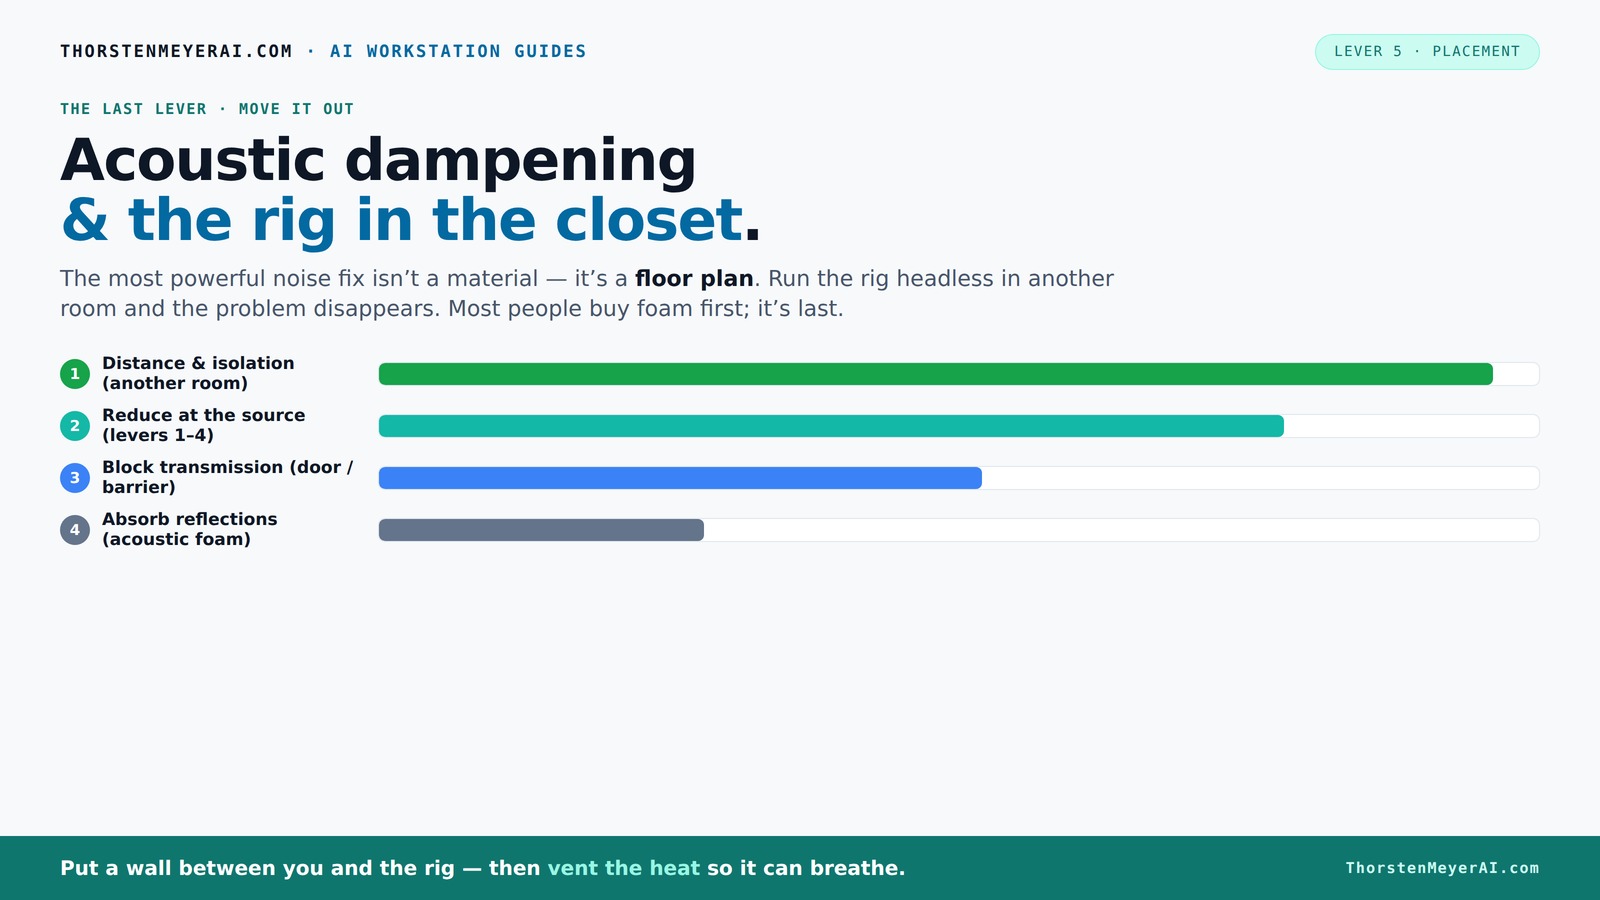
Acoustic dampening
& the rig in the closet.
The most powerful noise fix isn’t a material — it’s a floor plan. A rig you can’t hear because it’s in another room beats any amount of foam. Tap the approaches in Part 1 to see what actually works.
(another room)
(levers 1–4)
(door / barrier)
(acoustic foam)
Contain the noise, not the heat
Key Takeaways
- Sealing gaps around the door and cracks is more effective than just adding foam on walls.
- Placement of absorption materials at reflection points dramatically improves sound clarity.
- Small rooms can reduce echo but need corner bass traps to prevent low-frequency buildup.
- Ventilation is critical in closet setups — don’t trap heat or risk equipment damage.
- A closet can be a surprisingly good space for voice or AI rigs if you manage reflections, leaks, and heat properly.

24 Pack Black 12 x 12 x 2 Inches Pyramid Designed Acoustic Foam Panels, Sound Proof Foam Panels for Walls, High Density and Flame-Retardant Acoustic Panels, Sound Panels for Recording and Home Studio
Exceptional Sound Absorption:These pyramid acoustic panels are engineered to effectively absorb sound waves, reducing echo and reverberation. With...
As an affiliate, we earn on qualifying purchases.
As an affiliate, we earn on qualifying purchases.
Why a Closet Can Be Your Best Recording or Rig Space
Imagine a space so small that sound doesn’t bounce around like a cathedral — that’s a closet. The close walls cut down on echo and make reflections manageable. For voice work, this means clearer recordings with less reverb. For AI rigs, it means less noise leaking into your room, especially if you don’t want your neighbors to hear that 600W GPU rumbling.
Plus, you can DIY your way to a good setup with blankets, foam, and a bit of ingenuity. It’s cheaper than building a fancy booth or renting extra space. The key is understanding what’s really going on with sound and heat, then controlling those factors.

Knightsacoustic 96 Pack Sound Proof Foam Panels for Walls, 1 X 12 X 12 Inches Acoustic Foam Panels, High Density Acoustic Panels Sound Absorbing, Black Noise Cancelling Studio Wedges(NOT Adhesive)
PROFESSIONAL SOUND ABSORBING PROPERTIES – Our acoustic foam panels are expertly designed to reduce noise pollution by absorbing...
As an affiliate, we earn on qualifying purchases.
As an affiliate, we earn on qualifying purchases.
Best Materials to Absorb and Control Sound in Tiny Closets
Acoustic dampening isn’t about completely soundproofing — it’s about reducing reflections and echoes. Think of soft materials like thick blankets, foam panels, and rugs. These soften the sound waves bouncing inside your closet, making your voice clearer and your rig quieter. Learn more about acoustic treatment.
For small spaces, layering is key. Use foam panels on the wall behind your mic, blankets on the door and ceiling, and a rug on the floor. Bass traps in the corners help tame low-frequency buildup caused by parallel walls. Remember: thin foam alone isn’t enough — broad absorption makes a real difference.
Pro tip: Place absorption at reflection points — the wall behind the mic, the ceiling overhead, and the side walls near your head. This targeted approach boosts clarity with minimal material.

Audimute Soundproofing Acoustic Door Seal Kit - Door Sweep and Seal - (Large Size)
Includes (2) Door Seals (3/16" x 1/2" x 50') and (1) Door Sweep (1/2" x 1.5" x 25').
As an affiliate, we earn on qualifying purchases.
As an affiliate, we earn on qualifying purchases.
Where to Place Foam, Blankets, and Panels for Best Effect
Placement is everything. Start with the mic position — ideally, keep it away from walls and corners. Once you find your sweet spot, treat the reflection points. If you’re recording vocals, aim for the area where sound hits the wall behind your head. For AI rigs, focus on the side walls and the ceiling to prevent echoes that can cause noise and low-end buildup.
Don’t forget about the door. Use weatherstripping or acoustic sealant to block gaps. Heavy blankets or foam over the door can cut leaks significantly. For the floor, a thick rug or foam mat can absorb bounce and reduce overall noise.
In practice, use a mirror or even your phone camera to see where sound reflections bounce. Place panels or blankets at those spots for immediate improvement.

VEVOR Portable Vocal Booth, 6.56 ft Height, Portable Recording Studio with Travel Bag, Mobile Tablet Stand, Thickened Soundproofing, Sound Isolation Booth for Echo-Free Vocals, Podcasts, Voiceovers
Say Goodbye to Echoes: Built with durable Oxford cloth and acoustic padding, this recording booth for the home...
As an affiliate, we earn on qualifying purchases.
As an affiliate, we earn on qualifying purchases.
How to Seal the Door and Gaps for Maximum Noise Control
The biggest leaks in a closet are around the door and any cracks. Sound finds gaps — so sealing them makes a huge difference. Use weatherstripping tape or acoustic door seals to block the gaps. Overlap blankets or foam on the door itself, stapled or tacked into place, creates a barrier against sound leaks.
Pro tip: Check for cracks around shelves, vents, or light fixtures. Seal those with acoustic sealant or foam strips. For a quick fix, hang a thick blanket over the door, but for a more permanent solution, invest in proper sealing materials.
Remember: the tighter the seal, the less sound leaks out or in. That’s true whether you’re recording or trying to keep noise from disturbing your neighbors.
Managing Reflections and Standing Waves in Tiny Rooms
In tiny rooms, reflections bounce fast between parallel walls, creating a harsh, boxy sound. To prevent this, treat the first reflection points with foam or blankets. Place bass traps in corners to absorb low frequencies and avoid standing waves that cause low-end boominess.
For example, if your closet walls are close and flat, you might notice muffled bass or boomy echoes. Adding corner traps — or even DIY versions like rolled-up blankets stuffed into corners — can flatten those peaks. Also, angling some panels away from the direct reflection path helps break up the sound bounce.
Pro tip: Use a smartphone app to listen for standing waves or low-frequency buildup. Treat those areas first for cleaner sound.
Best Mic Placement to Minimize Reflection and Echo
The mic’s position can make or break your recording. Keep it close to your mouth, ideally 6-12 inches, and angle it slightly downward to avoid capturing room reflections. Use a reflection filter or shield behind the mic to block sound bouncing off nearby surfaces.
For voice, the goal is to pick up your voice directly while minimizing reflected sound. For AI rigs, mic placement isn’t as critical, but keeping the mic away from reflective surfaces still helps reduce ambient noise and echo.
Tip: Use a foam or reflection shield behind the mic. Test different angles and distances to find the clearest, most direct sound.
Common Mistakes That Make Tiny Voice Booths Sound Worse
Many DIY closet studios fall into traps that sabotage sound quality. Over-treating with foam can create a dull, lifeless sound; ignoring gaps around the door lets noise leak; and placing the mic too close to reflective surfaces causes echo and boxiness.
Another common mistake? Using only foam on walls without addressing corners or reflection points. Or sealing the space entirely without providing ventilation, which traps heat and can damage your equipment.
Avoid these pitfalls by balancing absorption with placement, sealing gaps carefully, and managing heat with proper airflow. Always listen critically — if your voice sounds muffled or your rig’s noise leaks out, adjustments are needed.
DIY Rigging and Cable Management in Small Closets
In a tiny closet, organization keeps the space functional and safe. Use shelves, hooks, and cable clips to keep cords tidy and prevent them from bouncing or rattling. Mount your mic on a boom arm or suspend it from a sturdy shelf to keep it away from surfaces that cause reflections or vibrations.
For power, use a power strip with surge protection and hide cables behind blankets or along the walls. Keep ventilation fans or heat exhausts away from your mic and cables to prevent noise pickup.
Simple tricks like velcro strips, zip ties, and DIY stands make a big difference. A cluttered space invites reflections and noise — stay organized.
When to Upgrade From DIY to a Real Vocal Booth or Enclosure
DIY treatments work well for casual use or initial steps. But if you notice persistent echo, low-end boominess, or heat problems, it’s time to consider a purpose-built solution. Commercial booths or sealed, ventilated enclosures are designed for both sound dampening and heat dissipation.
Look for booths with integrated ventilation, acoustic panels, and sealed doors. They can be surprisingly affordable and save you hours of tuning. For high-power rigs, cooling becomes critical; passive ventilation or ducted exhaust keeps everything cool without noise.
Think about your long-term needs. Investing in a proper booth makes sense if you’re recording daily or hosting professional streams. For casual, hobbyist use, DIY methods might suffice.
Frequently Asked Questions
Can I really make a closet work for voice recording?
Absolutely. With targeted treatments, reflection control, and sealing gaps, a closet can produce clear, professional-quality recordings. Focus on mic placement and reflection points first.How much does it cost to turn a closet into a decent studio?
You can do it cheaply with blankets, foam, and sealant for under $100. More serious setups with bass traps and ventilation might run a few hundred dollars, but it’s still far less than building a dedicated booth.What’s the biggest mistake DIYers make?
Many focus only on foam and ignore gaps or reflection points. They also forget about ventilation, trapping heat and risking equipment damage or noise issues.Do I need special microphones for a tiny closet booth?
A good dynamic or condenser mic works well, especially if you use a reflection filter. Cardioid mics pick up less room sound, making them ideal for small spaces.When should I upgrade from DIY to a professional enclosure?
If echo persists, or heat buildup causes noise or equipment issues, it’s time for a purpose-built, ventilated booth. Long-term use or professional work justifies the investment.Conclusion
Turning a closet into a recording or AI rig space doesn’t require a fortune — just smart placement, sealing, and treatment. Focus on reducing reflections where they matter most, and keep heat moving out. When you do, that tiny space transforms into a quiet, effective zone, saving you space and money.
Imagine your voice crisp, your rig cool, and the only sound you hear is your work. That’s the power of a well-placed closet setup — simple, effective, and surprisingly professional.